
Floor Insulation
Add a minimum amount or winterize your van by applying multiple layers.
RV insulation is a pivotal improvement to your cargo van, that impacts how you will use the vehicle. Type and amount of insulation is chosen based on location, vehicle type and size and material cost. But remember, with temperature control, insulation plays a partial role and at least as much attention must be given to ventilation and humidity control.
Considerations
Many decisions that follow are based on my 2016 Ford Transit LWB (Long Wheel Base) and Medium Roof. Keep that in mind, when applying this information to your specific vehicle model.
The general amount of insulation is greatly influenced by the location(s) where the RV has its primary use. If you live in one of the northern or plain states or Canada and you’ll use your van mainly on ski trips or other winter outings, insulation (and heating) play a bigger role. Thicker insulation materials, air barriers and window protection are needed to keep your house on wheels livable.
I live in Florida and plan to use the van primarily in warmer climates, such as the South West. The trips I’ll make, will include all the states and Canada, but mostly during summer. I’ll be following the sun, meaning that when temperatures go down, it’s time to pack up and move further south.
In my years of experience, I know that you cannot avoid colder temperatures or even freezing entirely, so a good heater is at the top of my list, but in general my focus is more on ventilation, while moderate insulation should suffice.

That said, my number one issue, that directly relates to the amount of insulation, is the interior height of the van. Most private and commercial upfitters choose a high roof vehicle for their conversion project. In most cases, they have room to spare to implement all their ideas. My medium roof Transit has more limitations. I’m of medium size and can walk straight up in the empty van without any difficulty. That changes after applying a floor and ceiling to the interior.
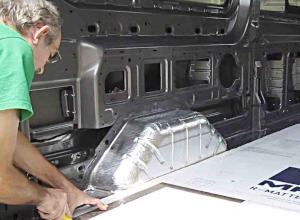
With a ½” sub-floor on top of the floor ribs, there’s less than an inch left for a ceiling and a finish floor. That leaves enough space for insulation between the ceilings bows, but almost none at floor level. Thankfully, in my opinion, insulating the floor is less important than shielding the roof of the van from the sun’s rays. I decided to fill the spaces between the floor ribs with foam board and use a spray foam for the remaining cavities between the ribs and the plywood sheets above it.
The type of material I choose, was Poly-Iso (Polyisocyanurate). It has the highest R-value per inch of any rigid foam board insulation and is locally available at very reasonable prices. Don’t use ordinary polystyrene, that has a much lower insulation value. An aerogel may offer the best in thermal performance, but is exorbitantly expensive. Than there is the popularity of Reflectix, a material that on its own, has little or no R-value and where long term performance may be uncertain.

The height of the floor ribs is slightly more than a 1/2 inch and I needed about 37 sf (3.3 lbs); that meant two 4′ x 8′ sheets with lots left, that I can use later in the walls and ceiling.
Before you start working on the insulation and/or sub-floor, you should consider, whether any electrical cables or plumbing lines should be installed prior to laying the floor. In general, that’s not advised as these features can never be accessed at a later time, without major modifications.
The actual work is quite simple and uncomplicated. Cutting with a sharp utility knife and a carpenter’s square is easy. The Ford Transit however, has a lot of grooves to fill, with many different lengths and widths and it took me the better part of the day, to get all the pieces together.
Which Parts To Choose
This page may contain affiliate links that I am compensated for at no cost to you. Please check out my privacy policy for full details, and thank you for supporting the site!
BUILD GUIDE UPDATE
Be the first to receive an update, when a new Project is added to this Build Guide. I also include a monthly overview of newly posted videos.
Materials

Poly-Iso Insulation Board
4′ x 8′
R-value 6.5
Tools
Steel Framing Square
16″ x 24″
L Shaped Tool
Black
Cutting Poly-Iso
Gather all the tools and materials before proceeding. Regularly fit the materials, to avoid mistakes.
- Mark and cut the individual panels.
- Set the blade to slightly less than the thickness of the material.
- Score the surface with the blade at a 10 degree angle.
- Then make a cut at a 75 degree angle.
- Score the back to release the individual panel.
materials
- 2 Sheets of Poly-Iso
½” x 4′ x 8′ each.
tools
- Carpenter’s Square
- Utility Knife
- Tape Measure
- Marker
Conclusion
A job well-suited for even the most inexperienced DIY-er, but it will take multiple hours to complete.
The materials for this part of the project, where acquired locally and the total cost was about $15.00.


QUESTIONS, SUBMISSIONS OR CORRECTIONS
The missing parts of the complete van conversion process are being added regularly to this Build Guide. If you want to suggest a specific build option for this guide, submit a content correction or have a general inquiry, send me an email.
Error: Contact form not found.
Disclaimer: Throughout this guide, all guidance, building techniques and other information are based on my own experiences of converting a cargo van into a Tiny House on wheels. This guide is only for informational purposes; always build according to local and national standards. Be aware that such a project is expensive, requires a substantial amount of broad knowledge of building techniques and involves more work hours than you can imagine. Besides of hitting a finger with a hammer, much more serious harm can be done when you work with 12V/120V electrical systems, propane installations, power tools, etc. Tapping into the vehicle’s own systems can also damage its functionality. Get professional help where needed; never take any risk!